 | ||||||||||||||||||||||||||||||||||||||
| Laughing Loon Shop Tips “Persistent people begin their success where others end in failures.” - Edward Eggleston Wood Strip Building Techniques I'm passionate about strip building boats! And I'm excited to pass on information that will make building easier for you. There is a lot of information on this page and it's growing all the time, so be patient and read through all of it because it will be well worth your while. I've spent the last twenty years unlearning conventional strip building techniques. I found a lot of the techniques, passed on in books, that were vague, poorly thought out and just didn't work. Parts of the strip building process were just not fun. I've spent the last twenty years solving these problems. My techniques for strip building are fun. ROB'S RULE #1: If you're not having fun, something is wrong, stop and solve the problem. Yes, some parts of the building process will be more fun than others, but if you are working with dread, something is wrong. Stop! Think about it. Ask questions. Look for answers. Too many people struggle through a task using a poor technique, or the wrong tool, because they think that's just the way it has to be. But it doesn't. Unfortunately a lot of books on strip building are writen by people lacking woodworking and boat building experience, who make-up techniques which are not only poor, but sometimes even counterproductive. When a novice builder buys a book they assume the author knows what they are talking about and the novice just "Follows the Leader" in learning a poor technique. You struggle through and get the job done, thinking "that's the way to do it!" And if you've "toughed it out" you'll have invested a lot of time and grief and believe you've learned all there is to know about strip building. Many builders will argue their way of building works just fine. And this is true, for them. A person can make fire by rubbing two sticks together. I find using a match much faster. This example of fire making is a metaphor for all aspects of strip building. A stripper too, can be built using crude, slow techniques. Or it can be built quickly and easily. You didn't know it, but you do have a choice. There is magic in every material, in every tool. And if you take the time to learn the "Tricks of the Trade" as the saying goes, you will be amazed at how easy and how much fun strip building can be. I will reveal some of these "Tricks" here, and there is much, much, more in my instruction books. I'm not saying the techniques I suggest are the only way to strip build. But the techniques I talk about here, used together as a system make strip building quick, simple and fun. Novice builders will not realize that many seemingly good techniques cause more problems than they solve. ROB’S RULE #2: Solutions to problems are easy. The trick is, coming up with a solution that doesn't create three NEW problems! Traditional strip building techniques use 1/4" strips and staples, or brads, to FORCE strips into place. This method creates real strip alignment problems in the most difficult areas near the keel and stems. While this worked reasonably well for simple football shaped hulls, for more complex modern hull shapes, kayak shapes and stapleless stripping methods, 1/4" traditional, forced stripping, makes perfect alignment of strips at the hull stems very difficult. It makes creating a "fair" hull, more, unnecessary work. Some strip builders advocate using a block plane to level the surface of a newly stripped hull. This is because they assume you will have problems aligning strip edges and that you will have a highly irregular surface that will need aggressive leveling. This reflects the problems THEY have with their stripping method. DO NOT USE A PLANE ON YOUR HULL SURFACE. I'm going to show you how to avoid those problems and how to avoid all the extra work they would have you do to achieve a fair hull. As a professional builder, I've had to eliminate techniques that cause problems or just don't work. The methods I suggest reduce work, period and don't create problems. I still enjoy building and have fun doing it. I want you to enjoy it and have fun too! With the right tools and techniques, work is fun, work is magic! Learning the techniques to make things is truly the magic in this world. Creating a real boat IS fun magic. Making your own little boat from some sticks and glue, a boat that will take you and support you miles out to sea, is true magic!!! | ||||||||||||||||||||||||||||||||||||||
| Stripping Made Easy If I repeat myself in the following it is because these are THE most important steps to your success. For centuries boat builders have used a "batten", a thin flexible strip of wood, to draw curved lines for boats. Battens are made of a clear, (knot or defect free) straight grained wood. A batten will form a perfect "fair" line when bent. A fair line is without bumps or dips, a smooth flowing curve. Boat builders try to build boat hulls which are "fair", so water will flow smoothly over the surface allowing the boat to travel as fast as possible. Somewhere in time a boat builder realized they could build a boat using a bunch of "battens" to create a fair hull, and strip building became a new boat building technique. | ||||||||||||||||||||||||||||||||||||||
 | ||||||||||||||||||||||||||||||||||||||
| Strip Building Theory, The Guiding Principles The beauty, the genius, of the strip building method is that IF the wood strips remain in contact with the stations & stems, AND the edge of each new strip is aligned and glued to the previous strip, the resulting surface IS FAIR and perfect. THE RESULTING SURFACE IS FAIR AND PERFECT! This is the essence and genius of strip building theory. Everybody kinda knows this, and yet, nowhere have I seen it clearly stated. The assumption is that you will have problems aligning strip edges and you'll just have to deal with it. Perhaps I see the beauty of the strip building method, more clearly, because as a sculptor I had to struggle with materials like clay and plaster trying to impose a shape on these formless materials. Where, with strip building, in a simple stroke, the strips create this perfect "fair" surface for me. It reminds me of the scene in the movie "Cast Away", when Tom Hank's character is alone in the banquet room after his rescue from the desert island and he looks at the butane candle lighter, and lights it a few times. You know he's thinking about how he struggled and bloodied his hands trying to make fire. Well I've bloodied my hands struggling to create a smooth fair surface with formless materials and I appreciate how quickly and easily strip building does this. NOTHING YOU DO WILL BENEFIT THIS PROJECT MORE AND ELIMINATE EXTRA WORK than taking all the time you need to insure each strip edge is aligned with the previous strip and each strip is in contact and remains in contact with the forms. If you do this, your hull will start off FAIR and you will need to do very little work to finish it! I cannot emphasize this enough. THE ONLY sanding needed is to round the high points along the strip joints and to smooth the surface for finishing. Each strip is perfectly fair, just as a plywood panel on a stitch and glue boat is perfectly fair. The less you do to this surface the more it will remain fair! I understand that quite a few builders have difficulty in aligning strip edges. I've developed a number of modifications to the traditional stripping technique to solve these problems. First, use 3/16" thick strips instead of 1/4". 3/16" thick strips are more flexible and are easier to twist, bend and align. The strength of stripper construction is in the fiberglass sheathing not strip thickness. 3/16" strips make as strong a hull as 1/4" strip with the same lay-up. Second, use northern white cedar to strip below the waterline. The area below the waterline is the most difficult part of the hull to strip. Northern white cedar is more flexible than other softwoods and has always been the preferred wood for canoe building for hundreds of years because of it's bending properties. You can buy northern white cedar strips from kit makers or buy boards from companies listed on my web site links page.- Third; Use a heat gun to apply heat to bend and twist strips into place instead of relying on force. A heat gun boils the water in the wood, to bend without having to wet the wood. This allows you to glue immediately without having to wait for wood to dry as you would if you used a wet/steam heat method. Northern white cedar is the best wood to utilize the heat gun method of bending for the already stated natural bending properties. NWC is typically air dried and the natural glue (lignin) which holds the wood fibers together can be reactivated by heat. Kiln drying wood alters the lignin and kiln dried wood will not respond as well to heat/steam bending, but it will bend, if you use patience and the heat gun. | ||||||||||||||||||||||||||||||||||||||
| Tricks for Taming Rogue Strips Heat Gun | ||||||||||||||||||||||||||||||||||||||
 | ||||||||||||||||||||||||||||||||||||||
| Steam and therefore moisture is a very good vehicle to transfer heat. But it is the heat that is important not the water. Heat promotes wood bending by reactivating the natural wood glue "lignin" that holds the wood fibers together, to move and reshape the wood fiber arrangement. The heat gun bends the smaller sections of wood strip we use, quickly. A part of the strip can be bent or twisted, free form, while the strip is on the boat. The wood is not clamped to a form and the wood remains dry so it can be glued immediately. See a short excerpt from my video "Stapleless Strip Construction" of bending wood strips with a heat gun, below. | ||||||||||||||||||||||||||||||||||||||
| An important point to remember about wood bending is that all the bending happens on the compression side of the wood (inside of the curve) so to use a heat gun effectively you must apply heat to the inside of what will be a curve. As with all wood bending, clear straight grain wood is important for success. Certain woods, such as ash, white oak, hickory, walnut and northern white cedar, bend very easily with a heat gun. Other woods may be bent with moderate success IF they are clear and straight grained and without grain run-out, that is without grain running off the edges. If the wood splits and breaks easily, you have grain run out. Clamp one section, near where you will bend the wood and hold the other end with a leather gloved hand (that heat is very hot!) or spring clamp and apply the heat from the heat gun to the flat of the strip. Hold the end of the heat nozzle about two inches from the wood and keep it moving back and forth in a small area. Twist or bend the wood with your hand building tension into the wood. You will feel the tension release as the wood reaches the right temperature. Kiln dried woods will take more heat often toasting the wood surface before tension is released. If you bend too far too fast you'll hear the wood start cracking as it starts to break on the tension surface (outside of the curve). Don't be afraid to break a few. The best way to learn bending with the heat gun is to play with scrap strips held in a vise. Most of the difficult stripping on our hulls is at the stems near the keel. Here strips from the bottom are twisted from horizontal to vertical at the stems. Clamp and immobilize the smallest section of the end of the strip you wish to bend. Long sections of strip will have a lot of flex and will be hard to induce more tension for bending. You have to over bend the piece because it will spring back. If you end up with a tighter bend than you wish you can just re-heat it and straighten it a bit. | ||||||||||||||||||||||||||||||||||||||
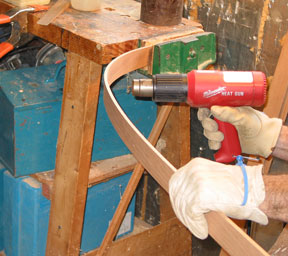
| At left, I'm hand bending a 1/4" X 2" mahogany strip for a cockpit coaming. One end is clamped in a vise while I apply bending force to the wood. I apply heat with the heat gun to the inside of the curve to be bent. Slowly moving the heat gun back and forth concentrating the heat in a small area without burning the wood. I will feel the tension in the wood release as the wood bends and I move the heat on down the strip, applying heat, applying force and feeling the tension release as the curve is shaped. The amount of force used and the bend made, must be greater than the finished shape, because the wood will spring back a certain amount. If you bend too tightly you can apply heat to straighten an area again. | ||||||||||||||||||||||||||||||||||||||
 | ||||||||||||||||||||||||||||||||||||||
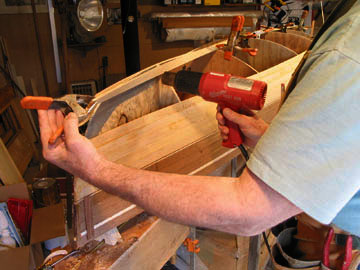
| One More Time! I urge you to focus your attention on pre-fitting each strip. Test fit each strip. Totally clamp the strip in place BEFORE GLUING using spring clamps. If you cannot get the strip to fit in a test clamp up, it will not fit with force once you apply the glue. Dry fit, clamp, and use a heat gun to bend strips, so they fit perfectly without force before applying glue. This will reduce work on every future step. If you work to align your strips the surface will be nearly perfect and you will have less work smoothing the hull. Any stapleless method that does not tack your strips firmly to the stations can not keep the strips from warping out of alignment. AFTER you have stripped your hull, if you have strips that are mis-aligned 1/32" or more, then fix the strip alignment before sanding. Use a new blade in a utility knife and cut on the joint, apply glue and realign the strip edges. If you use northern white cedar it will be even more flexible. And if you also use a heat gun to bend and twist strips into place you will find it very easy to strip a perfect fair hull or deck. Any one of these suggestions will make stripping easier. If you will use all three suggestions you will find stripping a lot of FUN! By understanding the basic theory of strip building, by looking at WHY we are doing something, we can focus our labors in areas that are most productive and eliminate haphazard and counterproductive steps. I hope you will find this useful. | ||||||||||||||||||||||||||||||||||||||
| | ||||||||||||||||||||||||||||||||||||||
| Go on the pages on Stapleless Stripping and Hand Beveling Strips and Sand Your Way to Beauty A Transparent Glass Lay-up | ||||||||||||||||||||||||||||||||||||||
| | ||||||||||||||||||||||||||||||||||||||
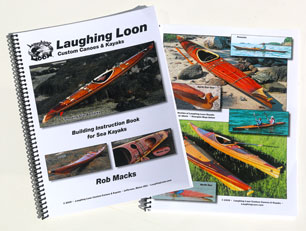 | New Updated version of Rob's Kayak Building Instruction Book! This book comes with all of Rob's Kayak Plans. OR, buy it separately, and use it to build any designer's stripper kayak, faster and easier. All the great innovations Rob pioneered are included, such as stapleless stripping using hot glue, bending strips with a heat gun and magnetic hatch covers! Buy the Laughing Loon Building Instruction Book for Kayaks for $25 plus shipping | |||||||||||||||||||||||||||||||||||||
| | ||||||||||||||||||||||||||||||||||||||
| ||||||||||||||||||||||||||||||||||||||
| | ||||||||||||||||||||||||||||||||||||||
 This is a big advantage over steam bending. Air dried woods bend easily with the heat gun because the natural glue that holds the wood fibers together, lignin, becomes plastic when heated. Northern white cedar is THE BEST! air dried wood for bending and wood strips. Kiln dried woods like western red cedar will not bend as well, because the lignin has changed in the drying process. But kiln dried wood will still bend if you go slow and try a few test pieces to get the feel for working with it.